1. CA Cost Tracking
In CA Cost Tracking page, it contains five views which are:
Weekly Rebate (Records the competitor’s weekly rebate)
Daily Rebate (Records competitor’s daily rebate changes by customer)
AOP/DP Entry (Quick entry page for sales forecast)
FC/VC (Record the manufacturing costs by depot and product)
Setup (Configure types of settings related to weekly rebate tracking)
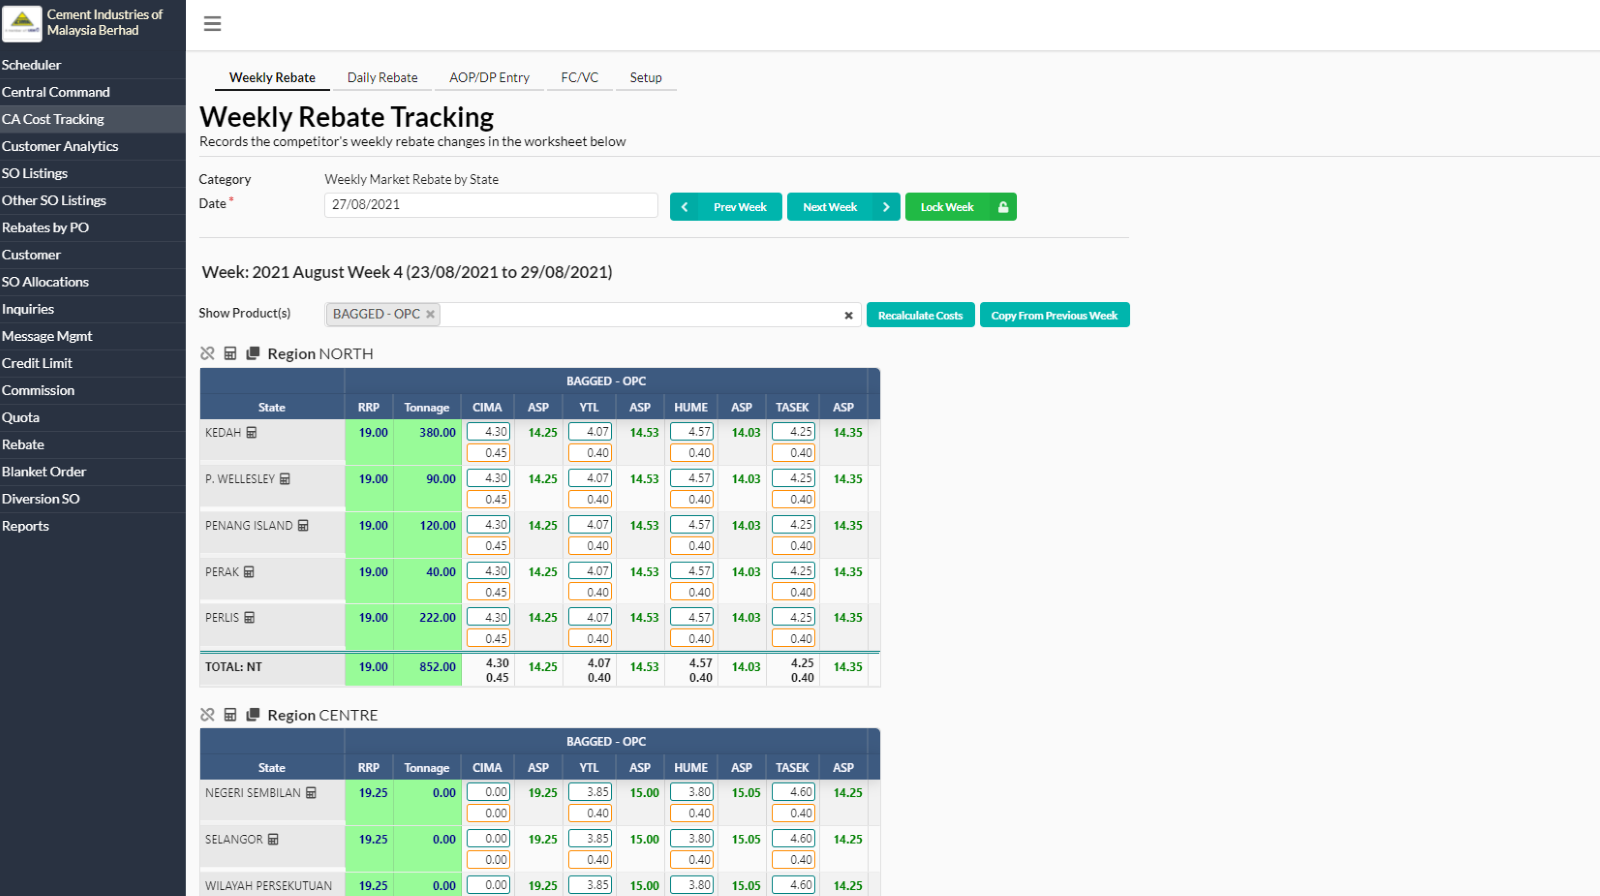
1.2. Weekly Rebate
- In Weekly Rebate Tracking tab, there are three action box which are “Prev Week”, “Next Week” and “Lock Week”.

- User can select any products from the dropdown list besides “Show Product(s)” and click on “Recalculate Costs” or “Copy from Previous Week” buttons.

- After clicking “Recalculate Costs”, a new dialog box will appear and user needs to tick at any options given then click “Recalculate”.

- For “Copy From Previous Week” button, it will shows another dialog box. The user has to choose the date and tick at any options given. Next, click “Start Copy”

1.3. Daily Rebate
- In Daily Rebate tab, there are two action box which are “New Entry” and “Refresh”.

- User can add tracking data by clicking “New Entry” button. User needs to fill in all the required fields then click “Add”.

- User can search for product details by clicking on each given fields.

- To view or edit all the details above, select any distributor/customer name.
- A new dialog box will appear for user to view or edit tracking data.

- User can also delete or update the tracking data by clicking on “Delete this record” or “Update” button.
1.4. AOP/DP Entry
- In AOP/DP Entry tab, user can choose forecast type, sourcing point, date, region and products by clicking the dropdown list.

1.5. FC/VC
- In FC/VC tab, user can check all the FC/VC at Bahau or Bukit Ketri.
- User can choose the years and products.

1.6. Setup
- In Setup tab, there is an action box under manufacturers which is “New Manufacturer”.
- User can add new manufacturer by clicking on “New Manufacturer”.

- User has to fill in all these required fields then click “Add” to add a new manufacturer.
- User can track the manufacturer by ticking at “Track this manufacturer?” tick box.

- To view or edit manufacturer, select any manufacturers name.
- A new dialog box will appear for user to view or edit manufacturer particular information.
- If there are any changes have been made, user needs to click on “Update” button to save any changes in the system.

- In History tab, user can check all the action that have been taken by which user.
- User can search for history using the search parameters as below:
- Action after this date
- Action before this date
- User
- Action
- Action Description
- Remarks

- User can add new tracked product under Tracked Products by selecting the products from dropdown list.

- A new dialog box will appear for user to add new tracked product information.
- Filled in all the required field. User can pick color by clicking on “Pick Color” button.
- Click on “Add” to save new tracked product information.

- To view or edit tracked product information, select any tracked product. A new dialog box will appear for user to view or edit tracked product particular information.
- If there are any changes have been made, user needs to click on “Update” button to save any changes in the system.
- To delete the record, user needs to click on “Delete this record” button to remove the tracked product information.

- For Tracked Customers, user can add new tracked customer by clicking the long bar -> “Create New Tracked Customer”.
- A new dialog box will appear for user to add new tracked customer. Fill in all the required field.
- Click on “Add” to save new tracked customer.


- To view or edit, user needs to select any tracked customer name.
- A new dialog box will appear for user to view or edit the tracked customer particular information.
- If there are any changes has been made, click on “Update” to save the new updated tracked customer information.
- To delete the record, user can click on “Delete this record” button to remove the particular tracked customer.

- Under Public Holidays, it contains two action box which are “New Holiday” and “Import Holiday” buttons.
- Under Working Days, it contains two action box which are “Add Whole Year” and “Add Single Month” buttons.

- A new dialog box will appear for user to add new holiday information
- Click “Add” to save new holiday information

- To view or edit, user needs to select any holiday name.
- A new dialog box will appear for user to view or edit holiday particular information.
- If there are any changes have been made, user needs to click “Update” button to save changes.
- To delete the record, user can click “Delete this record”.

- To add new working days, navigate to CA Cost Tracking -> Setup -> Working Days -> click on “New Whole Year.
- Click on “Proceed” to confirm the new added working days.

- User can also click on “Add Single Month” to reinsert month if necessary.
- Click on “Add” to add new working day.

- To edit/view working days, user needs to select any working day.
- A new dialog box will appear for user to view or edit working day particular information.
- Click on “Update” to save changes.
- To delete the record, click on “Delete this record”.

- Under Forecast Types, user can add new forecast types by clicking on “New Forecast Type” button.
- Under Forecast Regions, user can add new forecast region by clicking on “New Forecast Region” button.

- A new dialog box will appear for user to add forecast type

- To edit/view forecast type, user needs to select any forecast name.
- A new dialog box will appear for user to view or edit forecast type particular information.
- Click on “Update” to save the changes.
- If user wants to delete the record, click on “Delete this record” button.

- A new dialog box will appear after clicking on “New Forecast Region” button.
- Fill in all the required fields. Then, click on “Add” to add new forecast region.

- To edit/view forecast region, user needs to select any region name.
- A new dialog box will appear for user to view or edit forecast region particular information.
- Click on “Update” to save the changes
- If the user wants to delete the record, click on “Delete this record”.
